So many software programs, so little time
There have been so many discussions and debates about what digital skills a designer should have. We are bombarded with so much information that we end up spending hours and money on one digital skills lesson after the other. I, myself, have been through the same situation during my university years in architecture. I started with the basic software programs, like AutoCAD, Illustrator, Photoshop and InDesign, which were the most common tools used across my class. Then, during the 2 final years of university, when we got to work on more complex projects and also started thinking about the next steps after academia, the madness started; students began to learn different software programs and pay for so many digital skills lessons. I, unfortunately, got into the same loop. Today, having completed my master’s degree and living and working in the UK for almost 3 years, I realise that I should have had a more strategic thinking about which software program to learn and save myself some time and money.
This blog post aims to offer the tools for a more strategic and rational thinking behind these choices by linking academia with the work environment. More specifically, different design scenarios will be presented, based on my experience as a young professional, to give an idea about which software programs are mostly used in our field. This could help:
- Students in architecture who are about to graduate and they are already worried about which software program to learn; and
- Young professionals who are not sure which software program to master in order to build a strong cv.
SIMPLE PRINCIPLES
There are two steps that should be done before gaining any knowledge on software programs:
- Master sketching. Sketching is the first step towards design and as an architect you should be able to translate your thoughts into a sketch in no time. That is the first rule in the school of architecture. The first years you are a craftsman; anything you do from a sketch, 3D, elevation, section, poster, colaz to a model is done with your bare hands. Sketching does not necessarily mean you are good at drawing, but it does mean you can communicate any design thought through it. In a world that keeps changing and progressing, sketching is a strong asset for an architect to have.
- Know your specialisation. Studying architecture does not necessarily mean you will work as an architect. Studying architecture can also lead to interior design, urban design, landscape design etc. Therefore, it is important to spend some time thinking about what your inclination is in order to focus more on the software programs that are used in that specific domain. This can be easily achieved through the variety of projects you are exposed to in the university.
In principle, I agree with the argument that students should not be using any kind of software program in the first years of architecture, but at the same time, it is true that we live in a world where the dependency on those programs is becoming stronger and stronger. Therefore, I also believe that students should do their research, know their competition and start gaining practical knowledge through their projects in the university.
For example, in my last years in the university, I realised I wanted to follow the urban design practice and expand my knowledge in this field. Therefore, my final design thesis, found in this link, was a combination of architecture and urban design. I used this project to practise a software program that was commonly used for site design and urban landscape. However, what I failed to do was better research on the programs used in the work market and I ended up learning 3DSmax, a great intuitive 3D tool, but so complex and not popular in urban design firms across the world. Rhino or Revit on the other hand, are more commonly used in the professional field.
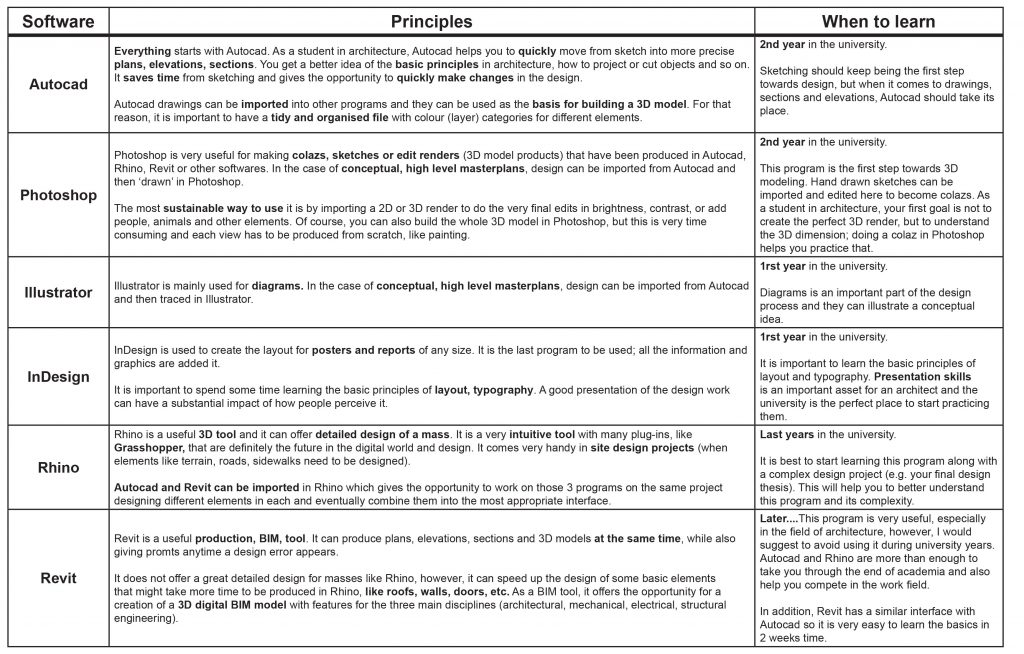
Below I have listed some of the software programs that I believe are essential tools for architects. Of course, different people might have different opinions, however, the ones presented here are tools that are most commonly requested in job applications for architects and urban designers:
DESIGN SCENARIOS
I am going to present a variety of design projects that I have come across at personal and professional level to illustrate how I have used my knowledge on the above software programs in practice. These scenarios are taken from my experience as an urban architect working in an urban design & masterplanning team. Let’s start:
Small scale. The two projects presented in this category were part of two architectural competitions:
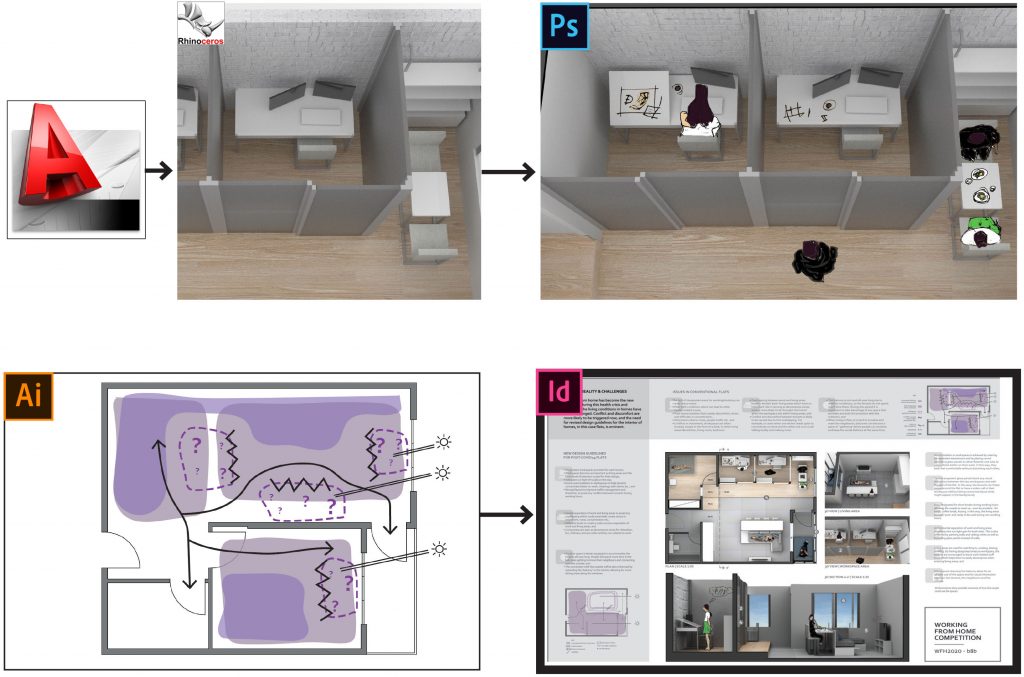
Flat design. The requested delivery materials included architectural plans of the interiors of the flat and a poster presenting the design process and thinking. The design steps were:
- Drawings a variety of sketches to conclude to a design idea;
- Designing the plans in AutoCAD;
- Importing them into Rhino to build the 3D model and then export the 2D, 3D and section renders. Materials and textures were also added here. This step could be made in Revit as well;
- Importing the 2D, 3D and section renders into Photoshop for the final edits; adding people figures and adjusting brightness and contrast levels;
- Drawing diagrams to explain the concept idea in Illustrator; and
- Producing the final poster in InDesign.
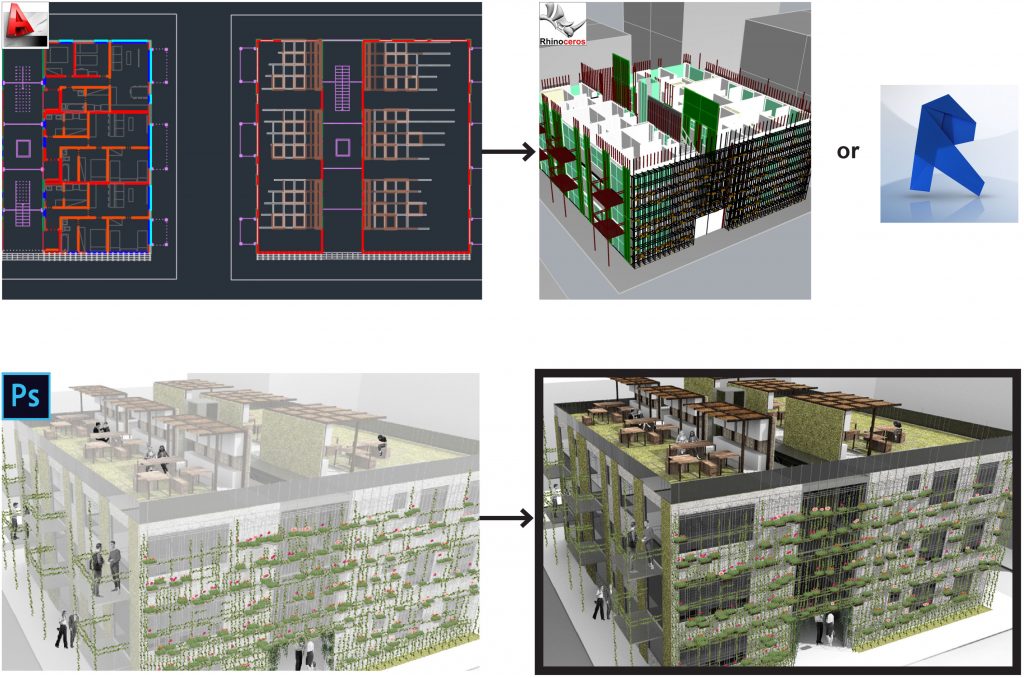
Block of flat design. The requested delivery materials included several 3D photos. The design steps were:
- Drawing a variety of sketches to conclude to a design idea;
- Designing the plans in Autocad;
- Importing them into Rhino to build the 3D model and then export the 3D and section renders. Materials and textures were also added here. This step could be made in Revit as well; and
- Importing the renders into Photoshop for the final edits; adding people figures, flowers, extra grass and adjusting brightness and contrast levels.
Medium scale. A common work scenario is the design of medium-scale high level schemes in order to describe a building layout, pattern or design principles and guidance for future development. In this case, you can either use an exemplar from another place that shares similar principles or design a version from scratch that encompasses these principles and it is relevant to this place. The usual design steps are:
- Producing any necessary plan in Autocad and make it place-specific;
- Importing the plans into Revit to create basic design elements like roads, pavements, buildings, street furniture. Those elements, along with roofs, walls, windows, doors, are standalone components in this program that can be quickly designed and edited (in width, height, thickness etc.). It might seem as a detailed drawing, but in reality you only have to select each element from the list and then place it; and
- Exporting the 3D model directly from Revit or, depending on what other edits you wish to do, importing it into Rhino (if you need to do more detailed edits on the masses), or into Photoshop (to add trees, people figures etc.), or maybe into InDesign (to add some annotations explaining each principle/element).

For this type of drawings, Revit wins over Rhino. Revit is a BIM production tool that includes a great list of any design component you can think of.
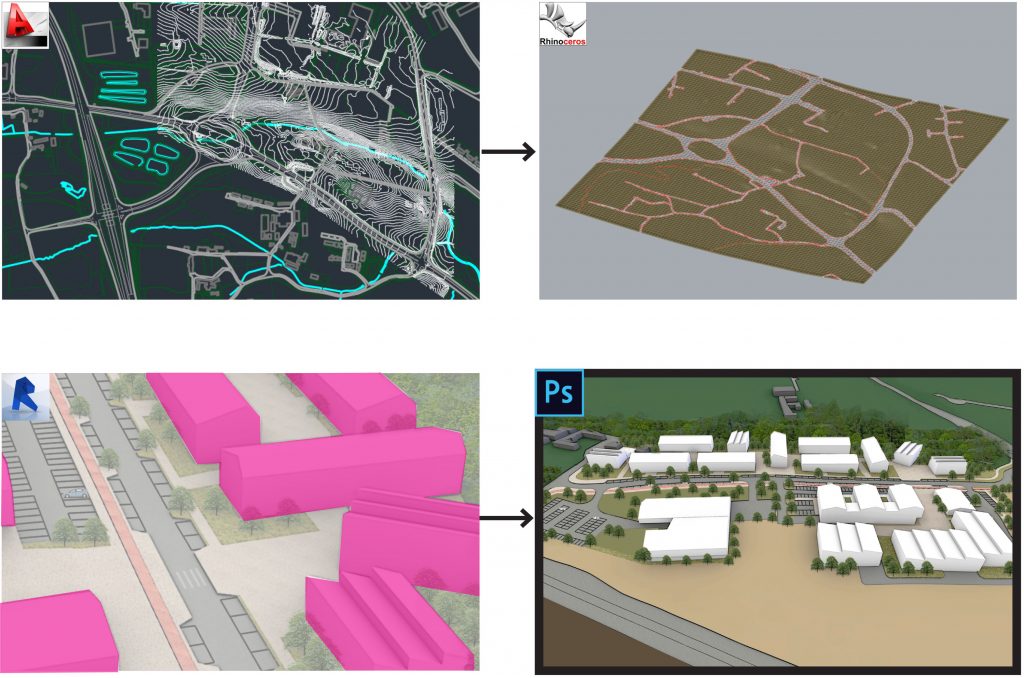
Site plans & topography. Topography is an important element in site/landscape projects. Therefore, the challenge here is that you are no longer working on a flat ground, but you need to include this detail in your project as well. This affects everything; roads, pavements, buildings. In this case, a combination of Revit and Rhino could be the best solution. The usual design steps are:
- In these cases, you already have the Autocad plan including the contour lines. The most important step here is to sort out the layers, organise them in colours and make sure all loops are closed in the form of polylines before importing anything into Rhino and Revit;
- I prefer creating all landscape elements, like the terrain, roads and pavements, in Rhino. Personally, I find this process easier in Rhino than in Revit. Rhino, via the ‘project’ command, gives you the ability to project all elements onto the shaped terrain and then easily split them into different layers creating your design components. Revit, on the other hand, does not have this option; it gives you another alternative to do the same thing but it is more time consuming.
- However, when it comes to buildings, I find Revit quicker, because you can import specific measurements and easily create roofs, windows and any other design detail I want.
- Photoshop is always the last step to edit minor details that will make your render look better and more realistic.
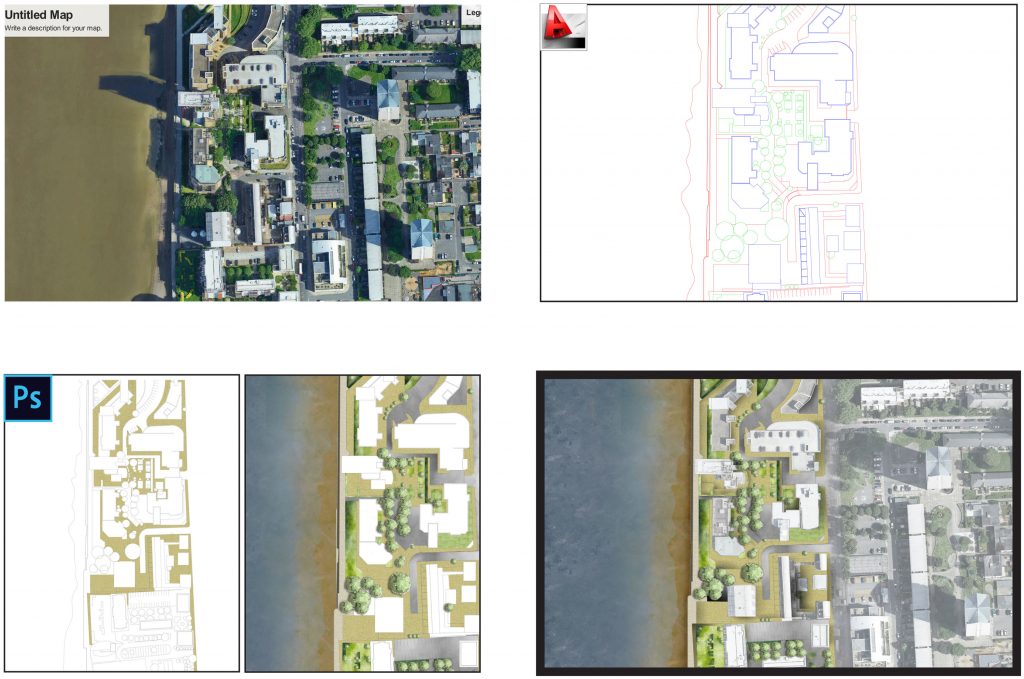
Masterplans. There are also cases, where you only need to do the top view masterplan for an area. In this case, I really like using as a background the existing google map view of the surrounding area in order to give a better idea of the context. For the rest of the design I use the ‘watercolour’ technique, as I call it. You can find more details about this in a blog post that I published some months ago.
The usual design steps are:
- Assuming you already have the Autocad plans for the particular area (however, for the purpose of this exercise I have used an existing area from google earth). Then, you draw your masterplan design proposal;
- Then, you import the plan into Photoshop. By using the watercolour technique you create all the elements for your design, like pavements, trees, road, buildings, shades etc. The final result is an illustration that is graphically similar to the google earth photo that is used for the background.
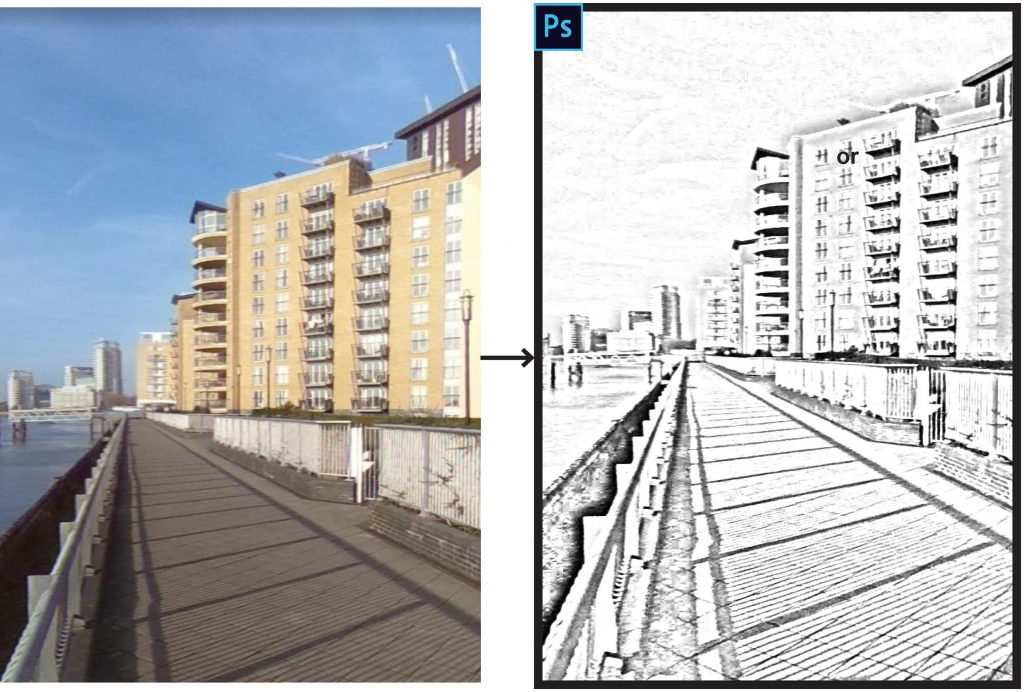
Photos into sketches. Last but not least, this is a simple trick that has saved me so much time. Photoshop can easily transform photos into beautiful sketches in 5 minutes (google it). You can also edit them by adding people figures, colours or any other element.
FINAL THOUGHTS & CONSIDERATIONS
Overall, my piece of advice to the students in architecture is:
Don’t rush it. There is plenty of time to learn any software you want during university. However, timing is everything. There is no point, for example, paying for digital lessons in the first year of university, because you do not have many design projects to apply that knowledge on. Take one step at a time; start watching tutorials and practise yourself till you reach a point where you know for sure that this is a software you want to learn in more depth. Then, start practising with design projects you are already working on in the university.
Master your design thinking first. As a student in architecture, it is important to study the history of architecture and practise your design thinking, exposing yourself to external triggers for inspiration. This is your main job during the first years of university and the projects you work on have this goal. Thus, you should avoid burying yourself in a computer screen to learn a software program and focus more on understanding the basic principles of architecture and design.
Work with your hands. My favourite time in the university was when I was building models of my design by hand and sketching my concept ideas. I remember spending so much time thinking about what materials to use, going to the shop to buy them and then spending so many days assembling the model. This process might have been time consuming, but it was also very productive.
Think strategically. Do your research properly and do not follow other students’ path. Think about the path you want to follow and worry less about how to get there. Once you know where you are going, you can then decide about the equipment.
To the young professionals I would suggest to:
Expose yourselves to….anything really. In your first years as a professional architect (of any kind) you need to get involved in as many different projects as you can. In this way, you will get experience in a variety of projects, find what interests you more and practise your digital skills.
Work on side projects yourselves. Your work should not end with your working hours. You need to also have side projects which you will work on during your free time – join architectural competitions, read architectural magazines, go to lectures or even design imaginary projects etc. This will improve your design and digital skills.
Do your research. Stay informed about the latest trends in software programs. This will give you an idea of the market.
Know your strengths and sell them properly. By getting involved in many projects you will start getting an idea of what your strengths are. Once you know, master and promote them in your portfolio, at work, in your personal website, anywhere.
Be 100% good at what you do. Knowing your strengths is not enough if you do not practice them on a daily basis. Design and digital skills need constant practise. Nothing comes easy. Stay outside your comfort zone and constantly look for new knowledge. Having a strategic thinking is useful to guide you through.